MyBatis 1、mybatis简介 1.1 mybatis历史 MyBatis最初是Apache的一个开源项目iBatis, 2010年6月这个项目由Apache Software Foundation迁2013年11月 迁移到Github。
1.2 mybatis特性 1) MyBatis 是支持定制化 SQL、存储过程以及高级映射的优秀的持久层框架
这里避免了手动获取结果集就很nice,不像jdbc中那么繁琐。
3) MyBatis可以使用简单的XML或注解用于配置和原始映射,将接口和Java的POJO(Plain Old Java Objects,普通的Java对象)映射成数据库中的记录
1.3 mybatis下载 下载地址:https://github.com/mybatis/mybatis-3
1.4和其他持久层技术对比
JDBC
SQL 夹杂在Java代码中耦合度高,导致硬编码内伤
维护不易且实际开发需求中 SQL 有变化,频繁修改的情况多见
代码冗长,开发效率低
Hibernate 和 JPA
操作简便,开发效率高
程序中的长难复杂 SQL 需要绕过框架
内部自动生产的 SQL,不容易做特殊优化
基于全映射的全自动框架,大量字段的 POJO 进行部分映射时比较困难。
反射操作太多,导致数据库性能下降
MyBatis
轻量级,性能出色
SQL 和 Java 编码分开,功能边界清晰。Java代码专注业务、SQL语句专注数据
开发效率稍逊于HIbernate,但是完全能够接受
2、搭建MyBatis 2.1 环境配置和工程 所需要的maven依赖 1 2 3 4 5 6 7 8 9 10 11 12 13 14 15 16 17 18 19 20 21 22 23 24 25 26 27 28 29 <dependencies > <dependency > <groupId > org.mybatis</groupId > <artifactId > mybatis</artifactId > <version > 3.5.7</version > </dependency > <dependency > <groupId > junit</groupId > <artifactId > junit</artifactId > <version > 4.12</version > <scope > test</scope > </dependency > <dependency > <groupId > mysql</groupId > <artifactId > mysql-connector-java</artifactId > <version > 8.0.16</version > </dependency > <dependency > <groupId > log4j</groupId > <artifactId > log4j</artifactId > <version > 1.2.17</version > </dependency > </dependencies >
核心配置文件 习惯上命名为mybatis-config.xml,这个文件名仅仅只是建议,并非强制要求。将来整合Spring
1 2 3 4 5 6 7 8 9 10 11 12 13 14 15 16 17 18 19 20 21 22 23 <?xml version="1.0" encoding="UTF-8" ?> <!DOCTYPE configuration PUBLIC "-//mybatis.org//DTD Config 3.0//EN" "http://mybatis.org/dtd/mybatis-3-config.dtd" ><configuration > <environments default ="development" > <environment id ="development" > <transactionManager type ="JDBC" /> <dataSource type ="POOLED" > <property name ="driver" value ="com.mysql.cj.jdbc.Driver" /> <property name ="url" value ="jdbc:mysql://localhost:3306/ssm? serverTimezone=UTC" /><property name ="username" value ="root" /> <property name ="password" value ="123456" /> </dataSource > </environment > </environments > <mappers > <package name ="mappers/UserMapper.xml" /> </mappers > </configuration >
2.2 创建mapper接口 MyBatis中的mapper接口相当于以前的dao。但是区别在于,mapper仅仅是接口,我们不需要提供实现类。
1 2 3 4 public interface UserMapper {int insertUser () ;
2.3 创建MyBatis的映射文件 对象关系映射的概念 相关概念:ORM(Object Relationship Mapping)对象关系映射。
对象:Java的实体类对象
关系:关系型数据库
映射:二者之间的对应关系
Java概念
数据库概念
类
表
属性
字段/列
对象
记录/行
2.4 映射文件 命名和位置
表所对应的实体类的类名+Mapper.xml
MyBatis映射文件用于编写SQL,访问以及操作表中的数据
两个一致 mapper接口和映射文件要保证两个一致:
mapper接口的全类名和映射文件的namespace一致
mapper接口的方法的方法名要和映射文件中的SQL中的id保持一致。这样,每次调用接口,都会根据接口找到对应的映射文件, 然后根据调用接口的方法,定位到具体的SQL语句
1 2 3 4 5 6 7 8 9 10 11 12 <?xml version="1.0" encoding="UTF-8" ?> <!DOCTYPE mapper PUBLIC "-//mybatis.org//DTD Mapper 3.0//EN" "http://mybatis.org/dtd/mybatis-3-mapper.dtd" > <mapper namespace ="com.zylai.mybatis.mapper.UserMapper" > <insert id ="insertUser" > </insert > </mapper >
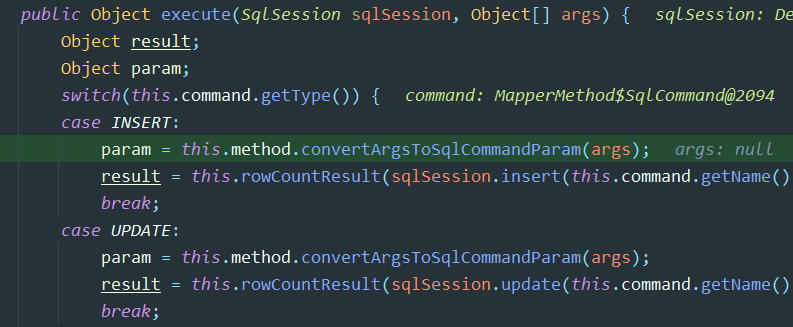
2.5 执行流程和原理 2.4.1 执行流程 1 2 3 4 5 6 7 8 9 10 11 12 13 14 15 16 17 18 19 20 21 22 23 24 25 26 27 28 29 30 31 32 33 34 35 36 37 38 39 40 41 @Test public void testInsert () throws IOException {InputStream is = Resources.getResourceAsStream("mybatis-config.xml" );SqlSessionFactoryBuilder sqlSessionFactoryBuilder = new SqlSessionFactoryBuilder ();SqlSessionFactory sqlSessionFactory = sqlSessionFactoryBuilder.build(is);SqlSession sqlSession = sqlSessionFactory.openSession(true );UserMapper mapper = sqlSession.getMapper(UserMapper.class);int res = mapper.insertUser();"结果" +res);
2.4.2 原理 通过Mapper接口的代理对象其实是执行这个SQL的最终方法,其本质上就是代理对象实现了接口中的方法,会实际执行SqlSession的具体方法,比如:sqlSession.insert("com.zylai.mybatis.mapper.UserMapper.insertUser");。此类方法根据SQL的唯一标识找到SQL并执行,唯一标识是namespace.sqlId,即mapper方法对应的全类名加上方法名。 因此,他会去获取当前方法的全类名和方法名作为参数传入上述方法中。
因此如果不使用mapper接口的代理对象,采用如下的方式,其本质上是完全一样的
总结:
:two: 代理对象重写了mapper接口中的方法
:three: 执行SqlSession的方法,参数是sql的唯一标识
:four: 返回结果
2.5 增删改查 mapper接口:
1 2 3 4 5 6 7 8 9 10 11 12 13 14 15 16 public interface UserMapper {int insertUser () ;void updateUser () ;void deleteUser () ;getUserById () ;getAllUser () ;
映射文件:
1 2 3 4 5 6 7 8 9 10 11 12 13 14 15 16 17 18 19 20 21 22 23 24 25 26 27 <insert id ="insertUser" > </insert > <update id ="updateUser" > </update > <delete id ="deleteUser" > </delete > <select id ="getUserById" resultType ="com.zylai.mybatis.pojo.User" > </select > <select id ="getAllUser" resultType ="user" > </select >
3 mybatis核心配置 3.1 配置顺序 MyBatis核心配置文件中的标签必须要按照指定的顺序配置:
3.2 properties标签 引入properties文件,此后就可以在当前文件中使用${key}的方式来访问value
1 2 <properties resource ="jdbc.properties" />
3.3 typeAliases标签 1 2 3 4 5 6 7 8 9 10 11 12 13 14 15 16 <typeAliases > <package name ="com.zylai.mybatis.pojo" /> </typeAliases >
3.4 environment标签 environoments environment transactionManager dataSource
1 2 3 4 5 6 7 8 9 10 11 12 13 14 15 16 17 18 19 20 21 22 23 24 25 26 27 28 29 30 31 32 33 34 35 36 37 38 39 40 41 42 43 44 45 46 47 48 49 <environments default ="development" > <environment id ="development" > <transactionManager type ="JDBC" /> <dataSource type ="POOLED" > <property name ="driver" value ="${jdbc.driver}" /> <property name ="url" value ="${jdbc.url}" /> <property name ="username" value ="${jdbc.username}" /> <property name ="password" value ="${jdbc.password}" /> </dataSource > </environment > <environment id ="test" > <transactionManager type ="JDBC" /> <dataSource type ="POOLED" > <property name ="driver" value ="${jdbc.driver}" /> <property name ="url" value ="${jdbc.url}" /> <property name ="username" value ="${jdbc.username}" /> <property name ="password" value ="${jdbc.password}" /> </dataSource > </environment > </environments >
3.5 mappers 使用package起别名
1 2 3 4 5 6 7 8 9 10 11 12 13 14 <mappers > <package name ="com.zylai.mybatis.mapper" /> </mappers >
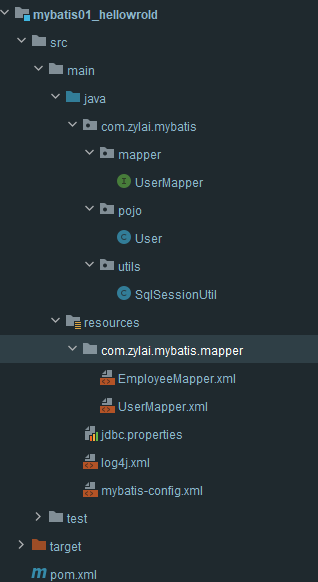
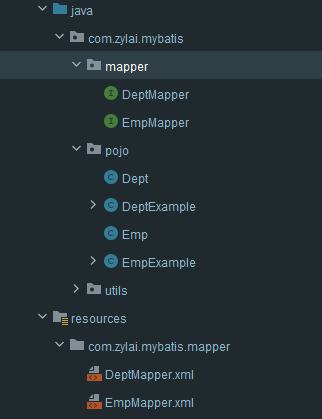
3.6 配置之后的目录结构
4 MyBatis获取参数 4.1 获取参数的两种方式#{}和${} #{}:会自动加上一对单引号,使用较多
${}:不会加上单引号,需要我们手动在SQL中为参数加上单引号,所以一般使用较少,不过在一些特殊的查询里会用到
4.2 mapper方法的参数为单个的字面量类型 4.3 mapper方法的参数为多个的字面量类型 4.4 mapper方法的参数为一个map集合类型的参数 4.5 mapper方法的参数为实体类类型 4.6 在mapper接口方法的参数上设置@param注解 总的看这里就好,上面的标题是为了生成思维导图。
1 2 3 4 5 6 7 8 9 10 11 12 13 14 15 16 17 18 19 20 21 22 23 24 25 26 27 28
1 2 3 4 5 6 7 8 9 10 11 12 13 14 15 16 17 18 19 20 21 22 23 24 25 26 27 28 <mapper namespace ="com.zylai.mybatis.mapper.UserMapper" > <select id ="getUserByUsername" resultType ="User" > </select > <select id ="checkLogin" resultType ="User" > </select > <select id ="checkLoginByMap" resultType ="User" > </select > <insert id ="insertUser" > </insert > <select id ="checkLoginByParam" resultType ="User" > </select > </mapper >
4.7 总结 真正使用的就是两种情况:
1.使用注解(包括了情况1,2,3,5 这些情况下建议都用注解)
2.使用实体类对象,直接通过实体类属性获取值就可
5、查询 5.1 查询一个实体类对象 如果返回值只有一条,底层调用的是selectOne方法。如果返回多条,就会报错
1 2 3 4 5 6 7 getUserById (@Param("id") Integer id) ;
1 2 3 4 <select id ="getUserById" resultType ="User" > </select >
5.2 查询一个集合 在xml文件中返回值类型选择集合对应的泛型即可
1 2 getAllUser () ;
1 2 3 4 <select id ="getAllUser" resultType ="User" > </select >
5.3 查询为单个数据 1 2 3 4 5 6 7 8 9 10 11 <select id ="getCount" resultType ="Integer" > </select >
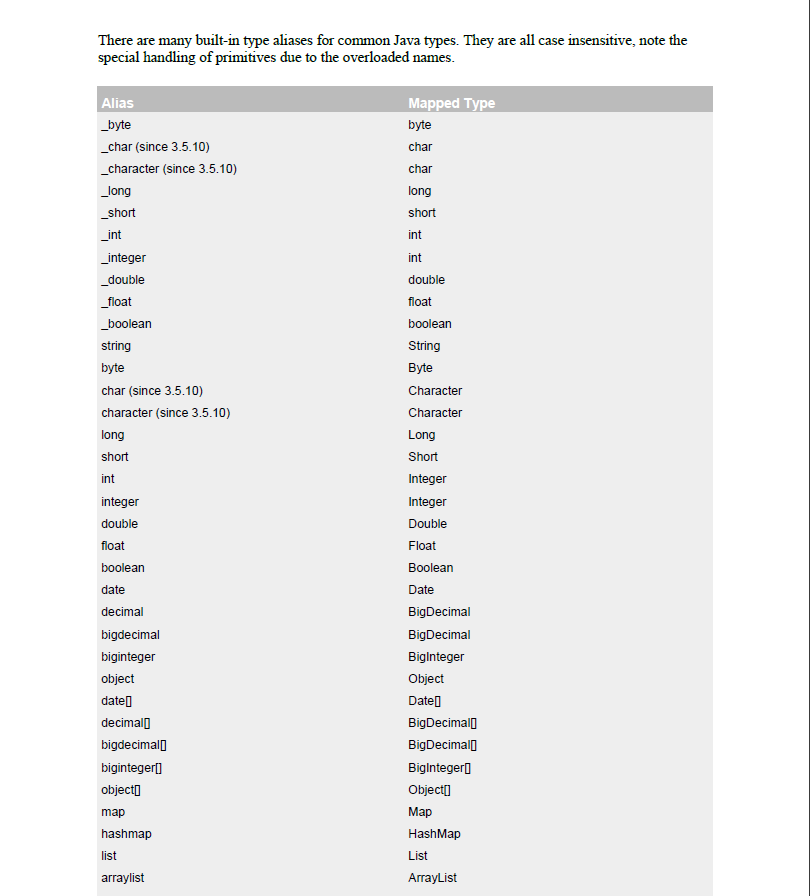
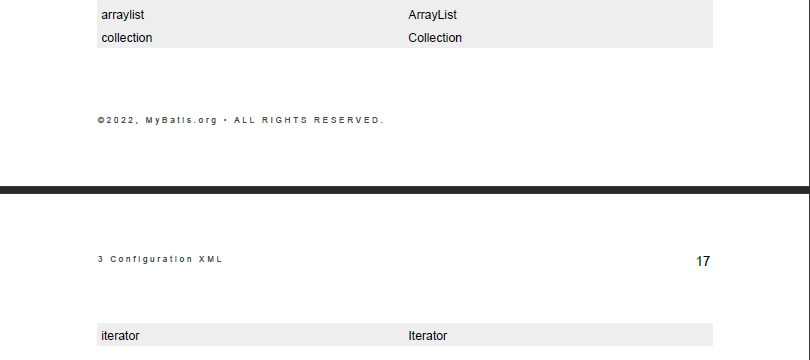
mybatis中常用类型别名
5.4 查询一条数据为map集合 1 2 getUserByIdToMap (@Param("id") Integer id) ;
1 2 3 4 <select id ="getUserByIdToMap" resultType ="map" > </select >
5.5 查询多条数据map集合 两种方案
5.5.1 List封装多条map 1 2 3 4 5 6 7 8 9 10 11 12 13 14 15 * 将mapper接口方法的返回值设置为泛型时map的list集合123456 , gender=男, id=1 , age=23 , email=123 @qq .com, username=admin1}123456 , gender=男, id=2 , age=23 , email=123 @qq .com, username=admin}123456 , gender=男, id=4 , age=23 , email=123 @qq .com, username=admin}123 , gender=女, id=5 , age=33 , email=3232 @163. com, username=xiaoming}123 , gender=女, id=7 , age=33 , email=3232 @163. com, username=xiaoming}123 , id=8 , username=jack}9 }getAllUserToMapList () ;
1 2 3 4 <select id ="getAllUserToMapList" resultType ="map" > </select >
5.5.2 大的map封装多条map 1 2 3 4 5 6 7 8 9 10 11 12 13 14 15 16 17 18 * 2. 将每条数据转换的map集合放在一个大的map集合中,但是必须通过@MapKey 注解@MapKey("id") 1 ={password=123456 , gender=男, id=1 , age=23 , email=123 @qq .com, username=admin1},2 ={password=123456 , gender=男, id=2 , age=23 , email=123 @qq .com, username=admin},4 ={password=123456 , gender=男, id=4 , age=23 , email=123 @qq .com, username=admin},5 ={password=123 , gender=女, id=5 , age=33 , email=3232 @163. com, username=xiaoming},7 ={password=123 , gender=女, id=7 , age=33 , email=3232 @163. com, username=xiaoming},8 ={password=123 , id=8 , username=jack},9 ={id=9 }@MapKey("id") getAllUserToMap () ;
1 2 3 4 5 <select id ="getAllUserToMap" resultType ="map" > </select >
6、特殊SQL的执行 6.1 模糊查询 {}会自动加上一个单引号,${}不会。包括6.2,6.3 1 2 getUserByLike (@Param("keyword") String keyword) ;
1 2 3 4 5 6 7 8 <select id ="getUserByLike" resultType ="User" > </select >
6.2 批量删除 1 2 void deleteMoreUser (@Param("ids") String ids) ;
1 2 3 4 5 6 <delete id ="deleteMoreUser" > </delete >
6.3 动态设置表名 1 2 getUserList (@Param("tableName") String tableName) ;
1 2 3 4 5 <select id ="getUserList" resultType ="User" > </select >
6.4 添加用户信息获取主键 1 2 void insertUser (User user) ;
1 2 3 4 5 6 7 8 9 10 <insert id ="insertUser" useGeneratedKeys ="true" keyProperty ="id" > </insert >
7 自定义映射resultMap 7.1 处理字段和属性的映射关系 三种方式 对于字段名和属性名不一致的情况,如何处理映射关系
为查询的字段设置别名,和属性名保持一致 (一般不用)
当字段符合mysql的要求使用_,而属性符合java要求使用驼峰
1 2 <setting name ="mapUnderscoreToCamelCase" value ="true" />
使用resultMap自定义处理映射
resultMap resultMap:自定义的映射关系
常用的标签:
1 2 getEmpByEmpId (@Param("empId") Integer empId) ;
1 2 3 4 5 6 7 8 9 10 11 12 13 14 15 16 17 18 19 20 21 22 23 24 25 26 27 28 29 30 31 32 33 34 35 <resultMap id ="empResultMap" type ="Emp" > <id column ="emp_id" property ="empId" /> <result column ="emp_name" property ="empName" /> <result column ="age" property ="age" /> <result column ="gender" property ="gender" /> </resultMap > <select id ="getEmpByEmpId" resultMap ="empResultMap" > </select > <select id ="getEmpByEmpIdOld" resultType ="Emp" > </select >
7.2 多对一映射处理 一个部门对应着多个员工,要查询完整的员工信息,就需要根据数据库中员工所在部门的部门id查询到对应的部门信息。
1 2 3 4 5 6 7 8 9 10 11 public class Emp {private Integer empId;private String empName;private String age;private String gender;private Dept dept;
1 2 getEmpAndDeptByEmpId (@Param("empId") Integer empId) ;
使用左外连接查询的结果:
如何将这个结果封装到Emp实体类中呢
7.2.1 级联查询 1 2 3 4 5 6 7 8 9 10 11 12 13 14 15 16 <resultMap id ="empAndDeptResultMap" type ="Emp" > <id column ="emp_id" property ="empId" /> <result column ="emp_name" property ="empName" /> <result column ="age" property ="age" /> <result column ="gender" property ="gender" /> <result column ="dept_id" property ="dept.deptId" /> <result column ="dept_name" property ="dept.deptName" /> </resultMap > <select id ="getEmpAndDeptByEmpId" resultMap ="empAndDeptResultMap" > </select >
7.2.2 association 1 2 3 4 5 6 7 8 9 10 11 12 13 14 15 16 17 18 19 20 21 22 <resultMap id ="empAndDeptResultMap" type ="Emp" > <id column ="emp_id" property ="empId" /> <result column ="emp_name" property ="empName" /> <result column ="age" property ="age" /> <result column ="gender" property ="gender" /> <association property ="dept" javaType ="Dept" > <id column ="dept_id" property ="deptId" /> <result column ="dept_name" property ="deptName" /> </association > </resultMap > <select id ="getEmpAndDeptByEmpId" resultMap ="empAndDeptResultMap" > </select >
7.2.3 分步查询 1 2 getEmpAndDeptByStepOne (@Param("empId") Integer empId) ;
1 2 getEmpAndDeptByStepTwo (@Param("deptId") Integer deptId) ;
1 2 3 4 5 6 7 8 9 10 11 12 13 14 15 16 17 18 19 20 21 22 23 <resultMap id ="empAndDeptByStepResultMap" type ="Emp" > <id column ="emp_id" property ="empId" /> <result column ="emp_name" property ="empName" /> <result column ="age" property ="age" /> <result column ="gender" property ="gender" /> <association fetchType ="eager" property ="dept" select ="com.zylai.mybatis.mapper.DeptMapper.getEmpAndDeptByStepTwo" column ="dept_id" > </association > </resultMap > <select id ="getEmpAndDeptByStepOne" resultMap ="empAndDeptByStepResultMap" > </select >
7.3 延迟加载 在核心配置文件中配置
1 2 3 4 5 6 7 8 <setting name ="lazyLoadingEnabled" value ="true" /> <setting name ="aggressiveLazyLoading" value ="false" />
开启之后还可以在mapper映射文件特定sql中的association标签的fetchType属性选择是立即加载还是延迟加载
7.4 一对多映射处理 7.4.1 collection collection标签表示一端中的集合,标签的ofType属性指定集合中的类型
1 2 3 4 5 6 7 8 9 10 11 12 13 14 15 16 <resultMap id ="deptAndEmpResultMap" type ="Dept" > <id column ="dept_id" property ="deptId" /> <result column ="dept_name" property ="deptName" /> <collection property ="empList" ofType ="Emp" > <id column ="emp_id" property ="empId" /> <result column ="emp_name" property ="empName" /> <result column ="age" property ="age" /> <result column ="gender" property ="gender" /> </collection > </resultMap > <select id ="getDeptAndEmpByDeptId" resultMap ="deptAndEmpResultMap" > </select >
7.4.2 分步查询 这个已经说过了,同上即可
1 2 3 4 5 6 7 8 9 10 11 12 <resultMap id ="deptAndEmpByStepMap" type ="Dept" > <id column ="dept_id" property ="deptId" /> <result column ="dept_name" property ="deptName" /> <collection property ="empList" select ="com.zylai.mybatis.mapper.EmpMapper.getDeptAndEmpByStepTwo" column ="dept_id" /> </resultMap > <select id ="getDeptAndEmpByStepOne" resultMap ="deptAndEmpByStepMap" > </select >
1 2 3 4 5 <select id ="getDeptAndEmpByStepTwo" resultType ="Emp" > </select >
8 动态SQL 对于客户端传过来的条件,如果没有内容,那么就是null或者空字符串””
8.1 if 通过test属性中的表达式判断标签中的内容是否有效(是否会拼接到SQL中)
1 2 3 4 5 6 7 8 9 10 11 12 13 14 15 16 17 <select id ="getEmpByConditionOld" resultType ="Emp" > <if test ="empName != null and empName != ''" > </if > <if test ="age != null and age != ''" > </if > <if test ="gender != null and gender != ''" > </if > </select >
8.2 where 1、若where标签中有条件成立,会自动生成一个where关键字进行拼接
2、会自动将where标签中内容前多余的and去掉 ,但是不会加and,所以在第一个if之后的语句都要加and。也不会将内容后的and去掉
3、如果没有任何一个条件成立,则where没有任何功能,即不会生成where关键字
1 2 3 4 5 6 7 8 9 10 11 12 13 14 <select id ="getEmpByConditionTwo" resultType ="Emp" > <where > <if test ="empName != null and empName != ''" > </if > <if test ="age != null and age != ''" > </if > <if test ="gender != null and gender != ''" > </if > </where > </select >
8.3 trim prefix,suffix:在整个标签内容前面或后面添加指定的内容
1 2 3 4 5 6 7 8 9 10 11 12 13 14 15 <select id ="getEmpByCondition" resultType ="Emp" > <trim prefix ="where" suffixOverrides ="and" > <if test ="empName != null and empName != ''" > </if > <if test ="age != null and age != ''" > </if > <if test ="gender != null and gender != ''" > </if > </trim > </select >
8.4 choose、when、otherwise 1 2 3 4 5 6 7 8 9 10 11 12 13 14 15 16 17 18 19 20 21 22 23 24 25 26 27 28 29 30 例如<select id ="getEmpByChoose" resultType ="Emp" > <where > <choose > <when test ="empName != null and empName != ''" > </when > <when test ="age != null and age != ''" > </when > <when test ="gender != null and gender != ''" > </when > </choose > </where > </select >
8.5 foreach
collection:设置要循环的数组或集合
item:用一个字符串表示数组或集合中的每一个数据
separator:设置每次循环的数据之间的分隔符
open:循环体之前以什么开始
close:循环体之后以什么结束
遍历集合和数组
1 2 3 4 5 6 7 8 9 10 11 12 13 14 15 16 17 18 19 20 21 22 23 24 <insert id ="insertBatchEmp" > <foreach collection ="empList" item ="emp" separator ="," > </foreach > </insert > <delete id ="deleteBatchEmpOne" > <foreach collection ="empIds" item ="empId" separator ="," open ="(" close =")" > </foreach > </delete > <delete id ="deleteBatchEmp" > <foreach collection ="empIds" item ="empId" separator ="or" > </foreach > </delete >
8.6 sql片段 可以记录一段sql,在需要用的地方使用include标签进行引用
1 2 3 4 5 <sql id ="empColumns" > </sql > <include refid ="empColumns" />
9 MyBatis的缓存 9.1 MyBatis一级缓存 一级缓存
失效的四种情况
不同的SqlSession对应不同的一级缓存
同一个SqlSession但是查询条件不同
同一个SqlSession两次查询期间执行了任何一次增删改操作
同一个SqlSession两次查询期间手动清空了缓存
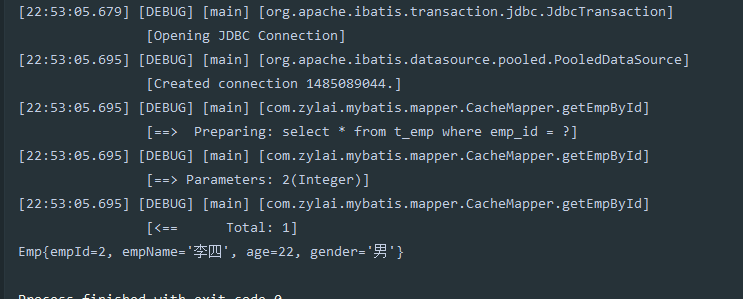
1 2 3 4 5 6 7 8 9 10 11 12 13 14 15 16 17 18 19 @Test public void testGetEmpById () {SqlSession sqlSession1 = SqlSessionUtil.getSqlSession();CacheMapper mapper1 = sqlSession1.getMapper(CacheMapper.class);Emp emp1 = mapper1.getEmpById(2 );Emp emp2 = mapper1.getEmpById(2 );SqlSession sqlSession2 = SqlSessionUtil.getSqlSession();CacheMapper mapper2 = sqlSession2.getMapper(CacheMapper.class);Emp emp3 = mapper2.getEmpById(2 );
只查询了一次
9.2 MyBatis二级缓存 二级缓存
二级缓存是SqlSessionFactory级别的,即通过同一个SqlSessionFactory获取的SqlSession对象
查询的数据会被缓存,再通过同一个SqlSessionFactory获取的SqlSession查询相同的数据会从缓存中获取
条件
在核心配置文件中,设置全局配置属性cacheEnabled=”true”,默认为true,不需要设置
在映射文件中设置标签<cache/>
二级缓存必须在SqlSession关闭或提交之后有效
查询的数据所转换的实体类类型必须实现序列化的接口
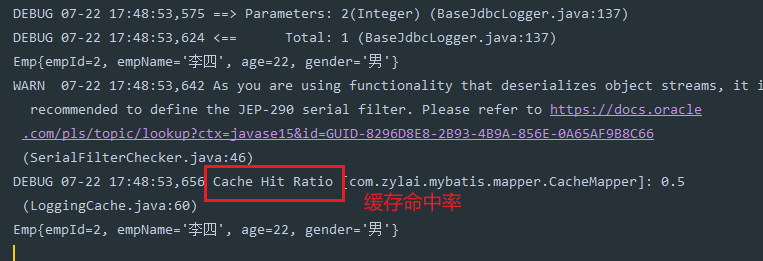
1 2 3 4 5 6 7 8 9 10 11 12 13 14 15 16 17 18 19 @Test public void testCache () throws IOException {InputStream is = Resources.getResourceAsStream("mybatis-config.xml" );SqlSessionFactory sqlSessionFactory = new SqlSessionFactoryBuilder ().build(is);SqlSession sqlSession1 = sqlSessionFactory.openSession();CacheMapper mapper1 = sqlSession1.getMapper(CacheMapper.class);Emp emp1 = mapper1.getEmpById(2 );SqlSession sqlSession2 = sqlSessionFactory.openSession();CacheMapper mapper2 = sqlSession2.getMapper(CacheMapper.class);Emp emp2 = mapper2.getEmpById(2 );
使二级缓存失效的情况:
两次查询之间执行了任意的增删改,会使一级和二级缓存同时失效
10 MyBatis逆向工程 正向工程:先创建Java实体类,由框架负责根据实体类生成数据库表。 Hibernate是支持正向工
10.1 步骤 1 添加依赖和插件 1 2 3 4 5 6 7 8 9 10 11 12 13 14 15 16 17 18 19 20 21 22 23 24 25 26 27 28 29 30 31 32 33 34 35 36 37 38 39 40 41 42 43 44 45 46 47 48 49 50 51 52 53 54 55 56 <dependencies > <dependency > <groupId > org.mybatis</groupId > <artifactId > mybatis</artifactId > <version > 3.5.7</version > </dependency > <dependency > <groupId > junit</groupId > <artifactId > junit</artifactId > <version > 4.12</version > <scope > test</scope > </dependency > <dependency > <groupId > mysql</groupId > <artifactId > mysql-connector-java</artifactId > <version > 8.0.16</version > </dependency > <dependency > <groupId > log4j</groupId > <artifactId > log4j</artifactId > <version > 1.2.17</version > </dependency > </dependencies > <build > <plugins > <plugin > <groupId > org.mybatis.generator</groupId > <artifactId > mybatis-generator-maven-plugin</artifactId > <version > 1.3.0</version > <dependencies > <dependency > <groupId > org.mybatis.generator</groupId > <artifactId > mybatis-generator-core</artifactId > <version > 1.3.2</version > </dependency > <dependency > <groupId > mysql</groupId > <artifactId > mysql-connector-java</artifactId > <version > 8.0.16</version > </dependency > </dependencies > </plugin > </plugins > </build >
2 创建逆向工程的核心文件 文件名必须是:generatorConfig.xml
1 2 3 4 5 6 7 8 9 10 11 12 13 14 15 16 17 18 19 20 21 22 23 24 25 26 27 28 29 30 31 32 33 34 35 36 37 38 39 40 41 42 <?xml version="1.0" encoding="UTF-8"?> <!DOCTYPE generatorConfiguration PUBLIC "-//mybatis.org//DTD MyBatis Generator Configuration 1.0//EN" "http://mybatis.org/dtd/mybatis-generator-config_1_0.dtd" > <generatorConfiguration > <context id ="DB2Tables" targetRuntime ="MyBatis3" > <jdbcConnection driverClass ="com.mysql.cj.jdbc.Driver" connectionURL ="jdbc:mysql://localhost:3306/ssm?serverTimezone=UTC" userId ="root" password ="root" > </jdbcConnection > <javaModelGenerator targetPackage ="com.zylai.mybatis.pojo" targetProject =".\src\main\java" > <property name ="enableSubPackages" value ="true" /> <property name ="trimStrings" value ="true" /> </javaModelGenerator > <sqlMapGenerator targetPackage ="com.zylai.mybatis.mapper" targetProject =".\src\main\resources" > <property name ="enableSubPackages" value ="true" /> </sqlMapGenerator > <javaClientGenerator type ="XMLMAPPER" targetPackage ="com.zylai.mybatis.mapper" targetProject =".\src\main\java" > <property name ="enableSubPackages" value ="true" /> </javaClientGenerator > <table tableName ="t_emp" domainObjectName ="Emp" /> <table tableName ="t_dept" domainObjectName ="Dept" /> </context > </generatorConfiguration >
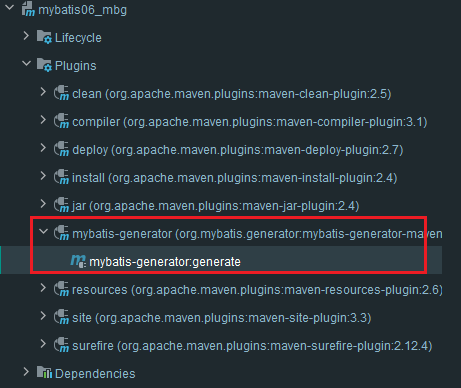
3 使用maven工程的插件执行
执行结果:
之后使用具体的方法即可
注意:生成尊享版本中有根据条件进行插入和更新等。他们是选择性添加或更新,如果指定的字段没有赋值,那么就不会给数据库中的字段赋值为null,而是由数据库的表采用对应的列的默认值
11 分页插件 11.1 分页功能 分页是一个很常用的功能,这就不再赘述,简单的写一下参数
limit index,pageSize
方式一:totalPage = (count+pageSize-1)/pageSize
方式二:totalPage = count / pageSize;
pageSize=4,pageNum=1,index=0 limit 0,4
首页 上一页 2 3 4 5 6 下一页 尾页
11.2 分页插件的使用步骤 1 添加依赖 1 2 3 4 5 6 <dependency > <groupId > com.github.pagehelper</groupId > <artifactId > pagehelper</artifactId > <version > 5.2.0</version > </dependency >
2 配置分页插件 在MyBatis的核心配置文件中配置
1 2 3 4 <plugins > <plugin interceptor ="com.github.pagehelper.PageInterceptor" /> </plugins >
11.3 分页插件的使用 a>在查询功能之前使用PageHelper.startPage(int pageNum, int pageSize)开启分页功能 pageInfo = new PageInfo<>(List list, int